Sunday, June 27, 2021

Week 17: Phase 3: The steps of woe. 27/6/21

 Last day of the week. Today what we've been able to do (Ben's helped again today) has been limited as we need the Sleepers to go in before we can move ahead, I also need to order more Gabions as we've now run out of the mesh to make the Gabion steps.

The start of the day looked like this with the large bit of earth needing to be cut out and got rid of.


By the end of the day it was looking like this...


Four steps almost in place, we could have gone further but we still need to dig the footings and put all the supporting concrete in around the next set of Timbers. The short timbers you can see in the image at the moment are only there temporarily to stop earth falling into the hole.


Last picture of the day before it started to rain hard again. We've cut the bushes at the back so that the bloke can see over the wall/hedge a bit better when he delivers the MOT stuff on Wednesday. You can't see it, but we've cleared the space at the top again - bringing the cut foundation slabs down to the bottom. I've also contacted one of the blokes at my cricket club who is a builder about some technical stuff and as suspected I've got too much MOT coming, so I need to cancel one of the bags and replace it with sharp sand and some cement. I'll do that on the way back from buying the 4 x railway sleepers. 

Saturday, June 26, 2021

Week 17: Phase 3: The steps of woe. 26/6/21

 Saturday - What no cricket? Ben got a message from test and trace saying that he'd been in the vicinity of someone who had Covid, so he had to isolate and the same for me until he got the results from his test through, so I had to contact the club and say I wouldn't be playing. So instead it was a day of gardening...

The plan going forwards was a step a day from now on, but I realised quickly I couldn't actually put in any further steps in because I need to put in the sleepers at the same time, so the plan for today was to do as much prep as possible.


The image above shows more of the sleepers put in place temporarily, giving an impression of how it'll look as the works done.
This image above illustrates an issue I need to address. It looks like the existing substrate under the paving slabs is substantial enough to go with before placing the sandstone tiles? Which means my order of 3 x bags of MOT may be well over the top, so on Monday I'm going to try and swap the order over for a bag of sand instead. Otherwise I reckon I'll have a whole bag of MOT stuck in the garden.


The image below shows one of the objectives - digging out the dirt and making it level with the step in front. This is now ready for the next load of paving slabs to go in to form the foundations.

Here you can see I've started to dig deeper holes to set the next set of sleepers in...

Dust everywhere from cutting up a batch of slabs to be used for foundations. In the meantime they're used as stepping stones on the mud.

Below the first experimental cutting of the sandstone. I've got a load of these massive slabs that are extra as these are what's going to be used on the steps....


Looking around and trying to keep up with the logistics of this, I still reckon there's space on the top half of the garden for more earth to be dumped as part of the leveling up. There's still a lot of earth that needs to come out of the bottom prior to putting the MOT down. It's amazing how space soon gets taken up with stuff and all this space here needs to be cleared soon for the MOT and sand delivery on Wednesday. 

The Sandstone slab above was cut to the size of the bottom step and I played around with seeing how it might be used and it looks at the moment that it just sits on top of the gabions and that may be enough. I'm going to leave it there as we work and see if it breaks over the next month or so. 

Week #17: Phase 3. The Steps of Woe. Friday 25/6/21

 Up early to get fleeced by the wood yard. On their website they're selling 2.4 Mtr sleepers for £20, when you get there, they're nearly £30! "Yeah we can't update our website fast enough, we buy them in and we don't know how we're going to have to pay for them, so yeah the price has gone up and I dunno how much they'll be for the next lot". Nice work if you can get it I guess.

So that was £112.00. On a roll and wanting to get shot of even more money we went into PGR on the way home and ordered the MOT Type 1 - 3 bags of the stuff + delivery using a Hiab, that came to £180 ish and that'll be delivered on Wednesday. So things are moving along at a pace now.

Here's Fridays activities...


Has some help in the last couple of days from Ben. Anyone that's in this business will probably laugh at our efforts, but here they are anyway. It may be the case that the whole lot caves in on itself, but looking at the arrangement and construction of the previous retaining wall and step my father in law Chris built nearly 40 years ago, I reckon what we've done will probably be good for a few years. This section though with these sleeper is probably the sketchiest....


Here's the sleepers we bought this morning. They're cut to 1.5 and are sunk into the ground to the same depth as the Gabions.

Ben below digging out the hole to set the Sleeper in.

This set of sleepers is the most problematic as they retain the largest amount of garden. Thankfully in engineering terms the majority of the force is at the base of the mass being retained. We're using loads of slabs to create the foundations of the steps, so the base of the 'Wall' seems to us to be secure.

The pressure lessons higher up the wall and we build the steps we'll be packing in as many concrete slabs to try and ensure the was is unable to be pushed in.

We have a contingency plan which we can put in place at a later date if this proves to be inadequate. which would be attach cable or thick nylon rope to the top of these longest sleepers and attach the other end well into the center of the garden to a lump of concrete to secure them further. 

Behind the sleepers at the base we've put another slab to prevent a pivot affect (See diagram below). 


This image here shows a dry run using the old paving slabs. These slabs are what we're building the foundations of the steps with, but we're using them in the short term in order that we can go up and down the steps whilst working, so as to not damage the nice slabs and getting them filthy.

We also use them to test how the slabs will work in a real life situation. As I've said before, I've not seen anything on the internet with regards how you make these steps, so everything we're doing is experimental. At the moment the theory is the Sandstone slabs will simply sit on top of the Gabions so we're trying to get the level of the gabions and the foundations exactly the same so that they're flush/level to facilitate that, but we're keeping an open mind about how successful or unsuccessful that might be. We've noted that these massive slabs break easily if on uneven surfaces. So it's a case of watch this space as we learn.


Goal for the day achieved - four steps in place along with the sleeper. You can see as the steps get high they're reducing the chance of the sleepers to be forced inwards.

Final image at the bottom here is the end of day image showing how far we've got.


Added up the costs today. So far £2600. 


Thursday, June 24, 2021

Week #17 - Phase 3: The steps of woe: 23rd & 24th

 23/6/21 - Another dry day and the conundrum of the steps. Rather than tackle the steps I decided that I'd work on the top part of the garden. Along the back of the main Gabions between the top of the gabions and the grass, the intention was to run a length of railway sleeper to keep the earth from infiltrating the gabions. But in taking down the ramp we had a big length of wood, so tonight I put this in place running along the back of the gabions.

That now allows me to now dump earth and clay onto the top part of the garden with some sense of the level I need to work to. So the rest of the evening was spent digging out the gully for the steps and putting the earth onto the top section which will be the lawn eventually. 

It's getting to the point now where I'm going to have to buy the sleepers and start putting them in, but I'm holding off for the moment as the step platforms are not due till this Friday. I'm still uncertain about whether the plan for the sleepers will work long term, but I can only try it and give it a go and see how it pans out.

24/6/21 Then in the style of these building companies and their chosen transport options, the Slab company go and deliver the slabs a day early, which is brilliant if you're doing nothing and don't work...

Thnakfully both Ben and Joe are at home and Ben was able to see the delivery off the lorry and have it parked outside our gate.

Ben's now unloading the pallet and getting the slabs into the garden. It can't be left there in the road just in case car drives into it or people start nicking the slabs. Anyway they're here and by the time I get home they'll all be safe and secure in the garden. 


By 11.00 Ben had sent me this picture...

 I asked Ben how the unloading had gone and whether there was any breakages. He replied...

"Sketchy. Very sketchy.

I had taken one of the sides if the wooden crate to get them out and they all began immediately tipping over into the road. I managed to stop them using my body weight before they began to seriously fall. I was shouting to joe that I needed help in the most panicked voice I could so he would get out of bed and eventually he did come out. I was shouting so loud that neighbours from down the road came and helped me prop the slabs up whilst me and joe took the big ones from the back of the stack.

We ended up laying them flat on the palettes because they were so heavy the blue tub wasn't enough and tipped over after about 6 slabs.

None were broken".


Looking at the picture I'm a little concerned that they're laying on top of one another as I'd imagine they'll be getting scratched. But then it is natural stone, so maybe it'll be okay?


Once home we moved the slabs again and re-stacked them. I need the space for the bags of MOT which I'm hoping will be dropped into the garden over the wall.

The images below show where we are as today. The gully has been dug out some more and the earth which is coming out of it is quite sandy, so I'm putting that onto the grass area see image below...

The image below of the close up of the large piece of wood was last nights work.


We're up early tomorrow to go and get the railway sleepers, I'm hoping to be able to get at least 4 of them on the roof bars, but we'll have to wait and see. Looking at what we did tonight (Ben and me) I reckon it should be possible to do a step per night. In the short term to keep the sandstone slabs in good nick I'm putting flag stones on the steps as we build them. Big day tomorrow and hopefully a significant move forwards with these steps. 


Tuesday, June 22, 2021

Week #17 - Phase 3: The steps of woe: Commencing 21/6/21

 Last week was an expensive one...

Sandstone Slabs £690 (Due this Friday)

Grabber lorry to take away the earth/clay £280

Rake and 6' spirit level £50.

I need to work out where to get the MOT from and try and get it dropped in the garden. This week I may have to start buying the Railway sleepers depending on how dry the 'Gully' is and whether I can dig more of the earth away. 

Monday 21st - Rain stopped play.

Tuesday 22nd - The rain stopped today and it was dry enough to get out and have a look at what I could do, I dug out some of the Gully and put in some more of the foundations for the steps see below. I can't really move ahead too quick as I need to start using the proper slabs in these initial steps to work out how I'm going to do it. Thankfully, I've got a bit of sandstone slab which is almost the size of the slabs that I will use and I've had it in placed and been walking on it and using it as a step. This has enabled me to see if my ideas work and whether they're practical and tonight I've been rectifying some of the issues.


What happened? I've tested some of the theories with the step construction and realised I need to make some modifications.

How do I feel it's going? It's progressing okay, slightly slower than I'd hoped but that's down to the weather and the logistics of moving large amounts of stuff around a relatively small space. I'm not sure whether my theories with regards the stability of the steps and the way I'm making the foundations is particularly sound.

What's good/bad? - The weather is one bad aspect and the spiraling costs, who'd have though that the MOT stuff was going to be as expensive as it is and that I'd need as much as I do! I've got a feeling the sand and cement is going to be the same. But, I am nearing the end with the costs involved in the patio.

Analysis - So, the initial design had the patio slab tucked under the gabions, but walking on the slab over the last couple of days has made me suspect that despite the weight of the gabions the patio slab might move. They're not going to be fixed using any cement and will be held in place by being held in place at the side and by virtue of their weight. What if they do move, as there's potential to move forwards potentially? I might then look at fixing them in some way. The red line is one idea, that is some form of plastic or rubber in a layer to add cushioning to stop the slab from moving as you walk up and down them and may help to keep them in position. It's experimental, but I could modify it fairly easily I reckon? 

One of the things I've done differently from the original plan idea is be more precise with the leveling. Before laying the concrete slabs which form the foundations I've used pebbles/stones in the clay to level the starting point (see images). Then as each slab goes in I've checked that they're level with a spirit level and I'm laying the stones and the slabs on geotextile fabric now. 

Another school boy error I've realised is that now the steps go up through the Gbaions I really needed the sides of the big Gabions to be made of 5mm or 4mm steel rather than 3mm, as the 3mm is bulging and not looking as good as it might have. 

Action plan - The gully beyond the Gabions needs to be wider as the gully will be lined with railway sleepers. So the earth beyond the steps here (below) needs to be removed to a good depth so that the sleepers are embedded deep enough so as to not collapse inwards under the weight of the grass either side. So tmorrow, more digging in readiness for the sleepers and possibly build and fill the next gabion? I'm also going shorten the depth of the step a little to 11" which should mean the steps will extend a foot less in the garden almost. 

Once the Gabion is in place the space behind it is filled with concrete slabs. The level is created by first laying stones down and establishing a level with those. Then 3 slabs are laid on top to create a foundation. 


The image above is with the 'Practice slab' in place, this is resting on both the concrete slabs and the gabions and this practice run now resting on the next gabion seems pretty solid and doesn't feel as though it'll move or be easily dislodged. 


Sunday, June 20, 2021

Week #16: Phase 3 - The Steps of Woe: WK commencing 14/6/21

 Got in from work and expected to make a start on the Gabions. Dug a hole and put in a big lump of breeze block as a base and then started to look more closely at the width on offer so that perhaps I could then start cutting the Gabions. I know the Sleepers are 100mm thick and looking at it I then realised that the steps themselves would be quite narrow. Michelle suggested using scaffold boards instead and for a while that seemed like a viable option, but then made the point that the scaffold boards would held in place at the base by the actual steps. He said the weight of the grass that they'd be supporting - only really fixed at the base by the steps there'd be a fulcrum effect. He also pointed out that once they got wet they may even buckle and distort. 

So at the moment I'm a bit flummoxed and again erring towards using Rail sleepers and having quite narrow steps. I've also realised that the sleepers should be embedded into the clay below the step level as much as possible, but to do that I'm possibly going to have to did a lot of earth out to make holes and then fill them in to hold them in place - perhaps even consider cementing them in place? 


This above is a cross-section of the steps.Once the earth has been dug out you can see the 3rd step will be flanked by earth either side. (1) I don't want to see this and (2) It'll quickly fall into the steps, so the step walls as such will (a) Need to be lined and (b) be strong enough to support the weight of the earth behind it. So In affect the walls of the steps are basically retaining walls and this is most apparent at the lower end of the steps directly beyond the Gabions (Light blue). The two Railway sleepers will need to be over a metre high from the steps up to the grass level. The sleepers adjacent to steps (D) and (E) will be about a metre. By my reckoning these will need to be embedded into the earth almost down to 'Patio' level and that means and awful more digging to sink the Sleepers. 

With the indecision I decided to make a decisive move on digging out the 'Gully' for the steps. I'd also brought home a board with wheels on to enable the filling of crates and moving the earth around. With all the digging I've now pretty much filled up my 1 tonne bags and really need to call in another Lorry to get rid of it all. 

I'm also 3 weeks away from my summer break, so I need to start ordering the next round of stuff.

16/6/21

Last night some progress was made with regards decisions as to how the steps might be constructed and it became apparent that we need the slabs that finish off the steps, so that we can build them 1 by one as we cut into the garden. I've found a place  that sells individual slabs that are 900 x 600 for about £15 each so I'm hopefully ordering 5 of these tomorrow. These will be cut down the long length so that they're two 300 x 900 slabs and the width of the steps cut off the ends - the width being around 720 and the depth of the steps a consistent 300. These slabs will probably be a slightly different colour to the patio, but I don't think that matters too much.

The objective over the next 7 - 10 days...

(1). Order the slabs.

(2). Book the grabber lorry and get rid of all the tat and mud

(3). Order three 1 x 1 mtr 4mm gabion grids

(4). Make the Gabion step boxes

(5). Move all the stuff in the patio area to the 'Tony's side'. Reason being that once we start laying the patio I want to start on 'Marks side' so that if we run short due to slabs being broken the broken slabs will be on Tony's side. 

(6) Start buying the Sleepers and getting them in. 

(7). Order the patio slabs and the MOT, sand and cement for delivery July 8th (PGR)?

(8). Look at how much a cement mixer is

(9). Buy a long spirit level, trowels and new buckets?

18/6/21

Some big movements forwards. Today Friday 18th. The grabber lorry turned up and took away the latest batch of clay and the garden is clear at the top now and from now on any dirt that needs moving we'll get rid more local to home in smaller amounts, probably leave it over at the Paddock and it can be used in repairs of the cricket wicket. There's not a great deal to by my estimation and a lot of it will get used leveling the grass area at the top. 

I've ordered the patio slabs and they might come Monday, I'm waiting for email back from the company to confirm that, otherwise they'll be here next Friday as arranged. The rain has been biblical in the last 24 hours, so it's impossible to do anything at the moment as it's getting to be like WW1 trench out there. I've been looking at how much MOT I need and an on-line calculator has suggested it might be as many as 4! So that's another £200.

Just spoke on Phone to the slab company and it'll be Friday now as previously arranged. 


The next day... (14th June)


15th June... Here I started to look at how the plan for the steps might work. One of the breeze blocks from the previous steps was buried at the bottom of what will be the new steps and the first Gabion placed on that. Behind this is then filled with concrete slabs which we got off a bloke a few weeks back as well as the slabs at the bottom of the garden in the 'Patio area'. At this stage the Gabion steps seemed feasible and relatively easy.


18th June 'Rain stopped play'. We'd had some really hot weather at the start of June, but on Wednesday it started to change and for the next 3 days it rained and rained turning the mud into something that started to resemble a WWI trench! I bit the bullet and had to accept that another grabber lorry was needed and on Friday morning it turned up and the bloke took away all the big bulk bags full of earth and clay. There were a few bits of wire that were used to contain the earth and he moaned about that and I had to pull it all out. The bags were a bit of an issue as well. It's obvious as well as making money from me taking the stuff away they obviously sell it to whoever takes it and therefore it has to be clean e.g. just clay or earth.

The blue tarp was an attempt to keep the area dry, but it didn't work that well. 


The image above is the area cleared of the Bulk bags. The shot below is a new angle I might start shooting from.


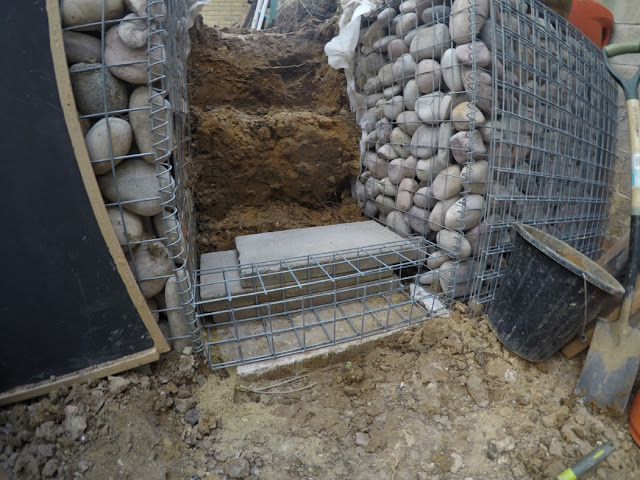
In between this shot and the next series of images Ben cut up a load of the mesh grids and made a step gabion using wire to construct it. He said that it was very difficult and had taken over an hour just to make one gabion and suggested using cable ties...
20th June
It's been cloudy now for the last 48hrs and a lot less rain so I was able to get out and do some work this afternoon.
This is Ben's Gabion that he made using the wire to construct it. I finished off one of the ends and that end took about 45 mins to do. Once finished I guessed that it was going to be tricky to wedge between the two big gabions either side of it....
You can see in the shot below that the wires are un-sightly.


I tried placing the Gabion in the step position, between the 2 main Gabions but as suspected, there was no way that constructed it was going to go in. But as in the image below if you placed two sections at a time and constructed the steps in situ it was possible. It also worked out that if you constructed the gabion using cable ties first that helped and the cable ties could then be supported with the use of wire once in place. 


This image above is the Gabion with the stones in and below is a rough approximation of what the Gabion step will look like. This temporary step is about the thickness of the slabs I've ordered, but they'll be deeper. The tread area will be about 11" deep if all goes to plan.

With the clay and earth still soaking wet, the only thing I could do today was cut more Gabions up for the steps and move a load of the stuff from the Patio area up to the top part of the garden in readiness for the MOT. I've managed to score a petrol compactor for the MOT and the stones will be here on Friday. I've got to find a supplier for the MOT who can deliver it with a Hiab so that it can be dropped into the garden rather than leave it outside on a pallet otherwise it'll all have to be brought into the garden in buckets - (4 tonnes of it)! I then started to lift some of the slabs...


I this shot above and below you can see that I've brought all the remaining cobbles up to the top again. 

That's it Week #16 done. Need to look into the MOT issue.

Bougainvillea UK. Zone 9 - December

 Growing Bougainvillea in the UK - Zone 9 (Essex) December care/observations The image above is from Dec 2022 and features three of the curr...