Wednesday, August 11, 2021

Week 24: Phase 4 and 5. First half of week.

 Monday The slabs are down and the grout stuff has been ordered "Azpects Easy Joint". Found it left outside the front door as we'd been out all day on Tuesday. Thankfully no-one nicked it.


A bit of Yoga and some exercise on the not quite completed patio this morning. The grouting has yet to be done, the walls painted and some snagging jobs. The lights need to be put up and a Canvas 'Sail' or two to create some shade. 


This is the garden at the start or day. The objective today was to start replacing the concrete slabs on the steps with the sandstone ones. I knew this was going to be tricky because of the fact that we'd need to do the steps alternately as we wouldn't be able to stand on the ones completed for another 24 hours, so it's a bit awkward.


These are the old concrete slabs that have been in place whilst we've working. We're up and down all day long with dirty boots and shoes, so if the sandstone slates would have been fitted already they'd be a mess. These slabs are just positioned with no mortar. 


above. The process. Before laying any mortar, the top of the gabion was filled with smaller pebbles, rocks and shingle. This created a level for when the 4:1 mortar was laid (Plus feb mix). The idea is that the mortar will bind with the stones, cobbles and the gabion wire to create a strong bond? Before being placed on top, the under side of the sandstone was treated with priming slurry. 


Initially I was concerned that the mortar might ooze through into the big cobbles that are visible at the front of the gabions, so in the first step I places a strip or Terram 1000 to help prevent that from happening. 


Above is how it looked with the mortar added. The slab was then laid on top and bashed into place and levelled using a rubber mallet and a spirit level to check the levels. 
Having the new slabs in place with their mortar drying as you try and work on the next one was awkward. The situation was then worsened as we took away the concrete slabs as these were all cut to approximate sizes and just laid on top of the gabions. This meant now working the sandstone slabs to more precise measurements -  30cm deep we had to make adjustments to the gabion positions. This was problematic as we hadn't prepped efficiently e.g. the slabs going in also needed to be cut to custom sizes and we  had a load of mortar and priming slurry ready to go. We managed to get these 4 in and the rest of the day and evening was spent getting ready for tomorrow having learned from our mistakes. Having said that if we make a start on the laying early, the mortar might still be compromised. So what we might do is all the prepping first - Custom cuts, wiring and strengthening the gabions, filling the tops of the gabions and any cavities. I might also do the grouting/jointing as the stuff is ready to go...


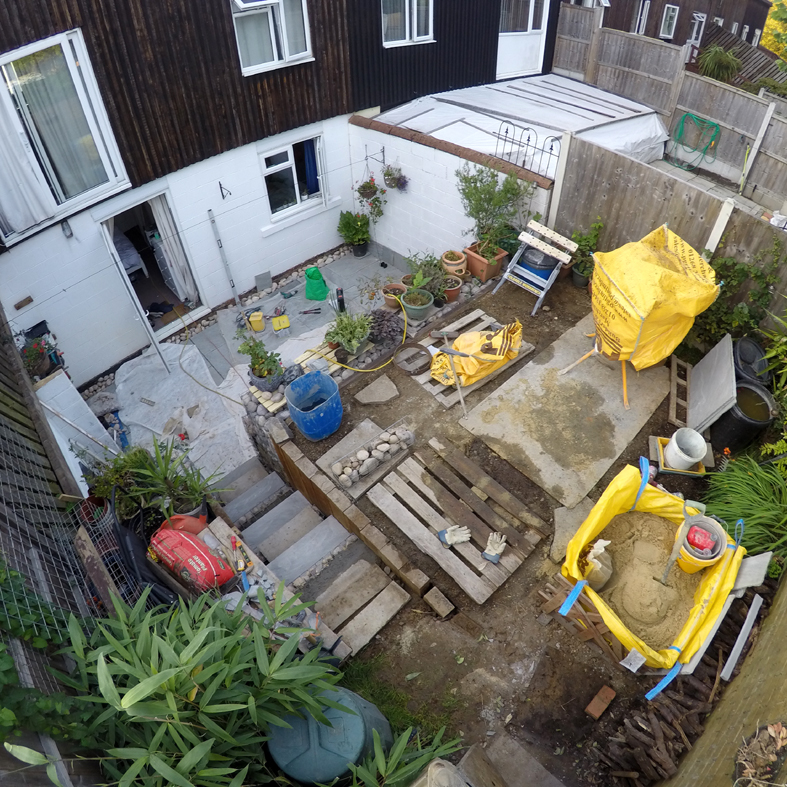
Last shot of the day with some moving around. The garden is gradually getting tidier and tidier and hopefully significantly so over the coming 4 or 5 days.

Friday, August 6, 2021

Week 23: Phase 4 - 2nd half of week.

 Not a lot doing Thursday, a little bit of prep work and tided up the garage. Slabs look good wet. 

Friday the final bag of sand was delivered about 11.30 and over Friday and Saturday we had a big push to get the work done e.g. all the slabs down. On Saturday with the mixer now at the top of the garden because we were running out of space we had to buy buckets and another 2 bags of cement. Saturday it rained a number of times for short periods of time and we were constantly back and forth covering up all the electrical stuff - the transformer and the mixer which is mains. There was nowhere to cut the slabs and I had to resort to cutting them outside the back gate almost in the road. Towards the end of Saturday it looked like we'd run out of cement and we had to mix the mortar with some of the left over MOT to bulk it out. The last slab went down at about 8.30 pm and we only had to throw away 1/2 a bucket of mortar.


Covering up the just laid slabs during one of several downpours during Saturday. 
10 - 15 mins later and the suns out again!


The garden doing its best impression of a building site.


No room for the work bench to cut the slabs, so had to move outside the back gate.


Getting there, but running out of room as we get squeezed into the final corner. At this stage it was looking touch and go whether the 2 bags that we'd bought during the day would be sufficient. 


Ben 'Scraping the barrel' literally to get enough mortar to do the last 4 slabs...


Done it! Finished at 8.30 pm. By the time we'd finished we'd had it with mixing cement, lugging slabs around and working dust and dirt. I'm going to leave it now for 48 hours or so to go off and then we'll get some pea shingle and Scottish Cobbles for the edges and some grout for the gaps. There's one sketchy bit - see the far end of the piece of wood on the slabs - the small square slab. The right-hand side gap is a bit big. The others have said leave it. I'm not so sure. 


The door shot and then off for a shower. 


Wednesday, August 4, 2021

Week 23: Phase 4. First half of the week.

 Rain's the other issue, it's no longer mentally hot, instead we're having constant showers, which may be a problem when it comes to the Slabs going down. I've got two weeks left of the holiday now, so hopefully I'll get the slabs done in that time! I've got everything - the primer came yesterday, so it's all systems go. It's just getting the level of the MOT right. There's another bag due on Monday 2/8/21 and hopefully that'll be enough to finish it off. In theory, if that goes down and is sufficient I can start laying slabs on Monday.

Monday - The MOT turned up at midday. I got 85% of it down to the bottom and then Ben got involved and helped finish it off and pack it all down using the Whacker plate. Initially I thought I was going to have too much, in the end it looks like I've probably got the right amount and I've used all of the bag.


Ben compacting the MOT and getting it leveled. I checked it with the level and it runs away left to right nicely and consistently and generally looks pretty good. 


Dry run looking at things like the gaps and how the slabs are inconsistent in terms of their size which means that the gaps between the stones will be different. Having done this above, I've decided that the cobble drain/gap against the house can be smaller. This'll help with the size of the slabs that will need to be cut on the gabion side.


I've got most of the slabs down and ready for tomorrow and the cement mixer.


Easy prime ready, just got to get some Febmix plasticizer for the mortar.


Cement ready and dry in the garage and the sharp sand is in the garden at the top. Everything is ready and it's all systems go. The only thing I'm not liking is the horrible red 'Engineering bricks' around the edge and as far as I can make out you can't and shouldn't paint them. To me they look ugly and spoil the aesthetics. 

Tuesday - Whoa, today was a bit tricky... Mixtures, ratios, space, timing with things going off and drying up, getting the ratios wrong and things going awry later on all a bit worrying, then when we got things going learning on the job, initially not getting enough mortar down, stuff like that, but eventually after the first barrow of mortar and about 4 slabs in we were on a roll and getting it done. 


I'm happy with today's progress as all of this was new to us, when you do the research it all sounds complicated and there's loads of worse case scenarios that they mention. Even the most basic things like the consistency of the mortar mix isn't an exact science and is more down to having a feel for it or prior knowledge. Our first attempt following the guidance on Youtube 'Don't make it too wet' was too dry, which mean that when you tried to level it using the rubber mallet the mortar didn't give. But the next batch and subsequent batches were spot on. 

Process was important and people having designated jobs as all of the mixtures go off or dry out and so you don't really want to be hanging around doing nothing, so it worked out that Ben was the Mortar mixed and I was the layer of slabs and we both primed the slabs before getting them down. One tricky thing was getting the levels of the mortar bed right. Initially I tended to not use enough which then led to having to lift them again - put more mortar in and re-lay the slab, which might compromise their longevity in the longer run.

We finished quite early in the end giving us time to clean everything up. There's a lot of residual waste - mortar, slurry and what have you and cleaning the mixer created some waste filled water with no obvious place to get shot of it. The waste cement we've put down the edges of the gabion steps to reinforce them as well, but I'm not 100% that's a wise idea as they need to be finished too. 

Wednesday - Today we ran out of space to work and almost run out of sand, so finished up at 5pm again. I then spent the evening clearing up as much of the stuff at the bottom to allow us to finish up on Friday. Tomorrow because of the lack of sand I'll get organised and plan Friday. The sand will be delivered on Friday morning some time, so we'll make a concerted effort to get the patio completed by the end of the day on Friday.


Sunday, August 1, 2021

Week 22: Phase 4 - 2nd half of the week

 A bit slow this half of the week as I mis-calculated the amount of MOT I needed and there's a 2 day delay in getting it delivered if you order it during the week at least.


So, this bulk bag arrived Friday morning at about 09.30 hrs and the driver said that he wouldn't be able to drop it into the patio area, so had to dump it at the top of the steps. I then spent the next couple of hours shovelling it into buckets and depositing it down in the patio area. This turned out to be a better way of doing it as it meant that I was able to put the MOT in the exact areas and get it up to the level of the markers. Not sure if I've said it before, but many of the videos I've watched have all said it's all about the preparation - get that right and the laying of the slabs will be so much easier and they'll stay down for years


I've moved to marking the depth levels with bits of old concrete slab. These are all measured in relation to the string lines and the top of the bit of slab represents how deep the MOT has got to go.


So, once the MOT is down it needs to be the same level as the slab markers. That then leaves a 50mm gap between the level of the MOT and the string. 30mm for the cement mix and 20mm for the thickness of the slabs. 


The lighter MOT on the LH side is todays work in the shot above.


Vice versa in the image above. Most of the work now has less visual impact on the overall look of the area, so I've been putting less images on Instagram. I'm now starting to do smaller 'Snagging' type jobs and some work on the Phase 5 part e.g. the grass area at the top of the garden. I'm also thinking forwards and trying to visualise where things might not be quite right and how to resolve those issues.


Like this image above. Currently this is how the finish will look when the slabs are cemented in place up against the gabions. As you can see there's an ugly gap where you can see the stones and clay the gabions are sat on. So the idea at the moment is that I'll buy some small stones or pea shingle to put in that gap to finish it off. 

Thursday, July 29, 2021

Week 22: Phase 4 - first half of the week.

 Big decision today to change the direction of the slope of the slabs. Up till today, the decision was to have the slope towards the gabions, but considering the original slabs sloped the other way and the drainage pipe is over that side of the patio area, I'm sticking with the tried and tested method. So the levels had to be reset. I've had help from both Ben and Joe today at different times for different jobs.


Above the old slabs prior to cutting them up into 2'x 1' sections to enable getting them up to the top of the garden. For the moment they're outside the back gate, I'll put them on FB soon and see if someone wants them for hard core or something.


Ben helping with re-setting the batons used to set the levels, changing the slope bias from towards the gabions back to towards the house as the original slabs were configured.


Joe drove over to West Thurrock B&Q to get some Sandtex exterior paint and he made a start on paintin the walls while I continued with setting the levels for the MOT. 


Here if you look carefully you can see the string levels all in place. Along the line of the levels pegs have been banged into the stones/base and these have the pipe sections on top of them to prevent anyone kicking them. I've kicked one this morning while I was wearing my Crocs and I reckon I've broken my toe as it's black and painful. I've had it in ice this evening and taped the bad toe to the good toe with masking tape. I'll try and ice it at least twice a day as I want to play cricket at the weekend. 


Looking the other way with Joe painting the wall under the area where the ramp was. 


Now we're getting places. The Terram Geotextile is down and we're moving to getting the MOT type 1 down...

Joe putting down the first bucket of MOT. Joe suggested that we put a tarp over the gabions and threw the MOT down using shovels and that speeded up the process massively. 


With all three of us working, both bags of MOT were emptied by nightfall. We need at least another 2 bags possibly more, so I'll order those tomorrow. When they're delivered we'll have them placed directly in the patio area as the PGR lorry has a hiab crane that'll extend that far. So tomorrow it'll be compacting the MOT and we'll see how that works out and if it looks as though more than 2 bags are needed. The edge on the house side is a bit of an issue as I need to keep the MOT from going into the drainage edge. 

Tuesday Difficult day today. Overnight reflecting on what we'd done yesterday and having had a discussion about how much more MOT we'd need, estimates ran from 2 bags to 6 bags from Ben. Had I dug down too deep, did I need more than 2 more bags? Thinking about it more I realised that I did have some rocks that I need to get rid of and perhaps I could smash them up and integrate with the MOT? Then I remembered all the slabs that I cut up into halves and thirds that I had outside the back gate... Could I smash those up and use those? The answer was yes, but how frustrating that I'd spent time cutting them with the disc cutter and carried them all up to the top when they could have stayed in situ? To make it worse once Ben came out and I told him what I was about to do he then said that Joe and he had already suggested that idea and I'd ignored them. In my defense I had now idea how far the MOT would go, but now it's down that would have been a good idea. So today I'm bringing the slabs down, moving some of the MOT aside - putting the slab where the MOT was and then smashing it up...


Then smash up with the sledge hammer and then cover again with the MOT.


I had to look on the web to find out how to start and use the Whacker plate, seemed a bit tricky what with having to work around the depth markers. Having gone over the MOT a bit, I reckon I need another 2 bags of MOT. I'm going to order one tomorrow which hopefully will be delivered on Thursday. So today I've completely cleared the patio area ready to go over the MOT properly tomorrow.

I've almost used all of the concrete slabs and resolved the edge of the MOT issue I was concerned about as you can see above. I spent an hour cutting the slivers of concrete which will now contain the MOT and stop it from going into the drainage area along the wall. By the end of the day I'd filled the drain with the spare cobbles I've got, so I'll post a picture lower down in the Wednesday post. 

The rest of the day I spent clearing the top area up and watering the plants as they were looking a bit dry. 


Main job tomorrow will to re-check the level pegs. I feel like the best thing to do would be to remove them to work with the whacker plate. I reckon I might do that and do something different to indicate the height to work to perhaps bits of concrete sunk into the MOT to show the level required? Sounds like a feasible plan.


The whacker plate. 

Thursday - Quiet today, no deliveries till tomorrow morning (Early), so some tweaking and tidying, getting stuff that we don't need or have used in the garage. The other thing Ben did was smash the pallets up for fire wood for when we get the fire pit going. This feels like a proper building site now -where the whole place looks like chaos and then suddenly it all comes together. I'm hoping this coming week we'll see this happening? 


The starting point shot from the back wall.


A few hours later and it's looking a lot tidier and organised. 


Shot from the upstairs window after the tidy up. The Yellow bag at the bottom in the patio area is where I want the bloke to drop the next bag of MOT. I'm hoping that his Hiab will reach right over there. If I can I'll get a shot of it happening. I've ordered another bag which'll arrive on Monday. 

General gardening notes and observations

2025 - Hanging Cherry Toms put in on March 22nd went ok, not a massive yield, but to be honest didn't do much with them in terms of push...